Saturday, December 3, 2011

Carry-on bag


Next item sewn for the flight to NZ:
A bag for the Carry-on luggage.


I made the pattern after the maximum allowed measurements at Singapore airlines:
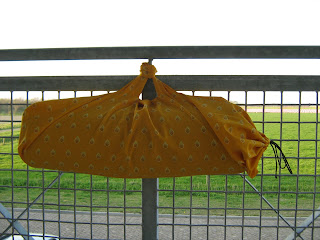
50 cm x 40 cm x 25 cm. That is 50 liter! I think it is huge. See the Knipmode magazine for reference. Of course in the picture it is filled and not quite that exact shape any more. And it may only be 7 kg (in the picture ist is filled with sweaters and weighs 6 kg).
The straps are long enough that I can carry it over the shoulder, but short enough that I can carry it in the hand without it reaching the floor.
It has one zippered and one 'open' pocket on the outside, and one zippered and one open pocket on the inside (for example for quick location of the zip-lock bag with the liquids).
The fabric is EtaProof, waterproof cotton.

Sunday, November 20, 2011

flight pants

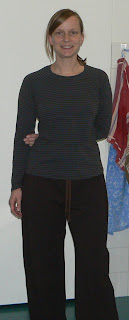
I made pants for the flight to New Zealand.


The pattern is from Loes Hinse, the Oxford pants.
I made the waistband lower, and made a combination of elastic and unelastic band in a tunnel.


The fabric is a dark brown ponte di roma knit from mainly rayon.
I hope these are as comfortable as but look better than sweat pants.
I will try them out on a ride on the night train next weekend.
They will go with the beige striped longsleeve I made last year and another brown-teal striped longsleeve I made in September from the same pattern, my TNT Zoela from Farbenmix.

Wednesday, July 20, 2011

More about the eagle T-Shirt


kbenco is right (thanks for your comment), I was not very generous with information on the reverse applique. The backing fabric is the same quality as the T-Shirt fabric (I bought two T-Shirts of the same brand). The whole method is explained in this book: http://alabamachanin.com/books/alabama-stitch-book
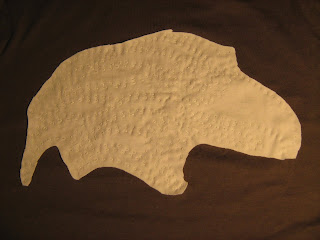
There is lots of inspiration in the book, but the method can more or less be figured out by looking at a (good) photo. I found the eagle stencil googling "eagle stencil". I would like to design my own stencil - "next time". I applied the fabric paint with a sponge, that worked better than what I tried with a brush on a sample, but a spray bottle would probably be best. Then I stitched around all shapes by hand, through the top and backing layer, using double thread. I left the knots on the right side, as suggested in the book, as that reminds me of feathers. Finally you cut out the inside of the shapes until about 5 mm from the stitching line, careful not to cut through the backing fabric. And trim away the excess fabric on the inside of the T-Shirt. The eagle head in the photo is about 30 cm wide. Here is a photo of the inside of the T-Shirt. The fabric is actually white, but I took the photos late in the evening.


By the way I did all the stitching while DH was watching the Tour de France, I sat right behind him at the dining table, and I was glad - but not surprised - that he did not ask what I was doing.

Sunday, July 17, 2011

More gifts

I made towel with a hood for a school friend's baby.

The ribbon shows some Bavarian motifs, as my friend lives in Bavaria now and is teased with that.

From a thick elastic and some beads I made a lane-counting-wristband for a friend who takes me swimming sometimes. I have no idea if it works, and have not given it to her yet.


For my husband I reverse-appliqued an eagle on a purchased T-Shirt.

This was my inspiration:
http://alabamachanin.com/items/eagle-shirt

Gifts

I made several gifts the past month.
A name banner for the baby of a study friend of mine:

The measurements are from the book "One Yard wonders". I glued on the felt letters with textile glue. The numbers are pinned on and exchangeable, now they show the date of birth but can be changed to show the age. I also made a little bag to store the banner in, and the other numbers. The fabric is from Liberty, my brother bought it for me one christmas, I think he had little clue what to buy (when I was in London earlier visiting him he waited outside Liberty), but everybody in the shop seemed to want this, so this is what he chose. I still have some fabric left. Maybe I'll make something for his daughter from it one day. But this banner was a lot of more work than I thought!


For my sister, who is travelling a lot, I made a little pen case with an elastic to fix it to a notebook. First photo shows the miniature pens that should go into it, and my paper model.

Then I made a test model, to figure out how to sew together the outer fabric and the self-fabric lining, because I challenged myself to make it so that no stitches are visible on the outside.

And here is the finished thing.

Monday, June 13, 2011

I made a softshell jacket!

I finished a softshell jacket this month, and I am very happy with it. I think it is the most professional looking garment I have ever made.

For the pattern I used Jalie 2769. It is a sporty jacket with raglan sleeves, a stand up collar and front pockets. The pattern has quite a lot of detail compared to what I normally sew, but was not difficult to sew.

The softshell fabric from extremtextil is a three layer fabric: on the outside it is a little bit shiny from polyamide with lycra for stretch, polyester fleece on the inside for warmth, the middle layer is a membrane to make it water-and windproof while breathable, and it is impregnated with polyurethane. Perfect for outdoor activities in cool wet autumn or april weather. It looks a bit like neoprene diving suit.


I am a European size 38 on top and 42 at the bottom, I made size 40. The fabric I used has a little less stretch than the recommendation. It is not too small at the hip, but quite roomy on top. I think the excess fabric under the sleeves is intentional because it is a sports jacket. If I were to make it again I would go down a size at the upper part of the jacket.

I especially like the pockets, the yoke and the topstitching. The sleeves are nicely long and narrow at the cuff. There are many decorative dividing seams, but not all are functional, the yoke does not function as a bust dart, and in the back there could be more shaping in the dividing seams. I don’t routinely sew in zippers, and unpicked the front zipper once because the dividing seams did not align. Still not perfect, I think that was a cutting mistake. The fabric is quite thick and I should have cut from a single layer. Sewing this fabric was surprisingly easy.

For the pockets I used polyester lining, I used waterproof zippers, polyester thread and a jersey needle. I did not zig zag the seams because softshell does not fray. The sleeves are not lined but maybe that would not be a bad idea.

I am very happy I finally made this. I had kept the bill in the box with the fabric so I could see how long it took me to start this. By the way the fabric cost about 25Euro, with all the notions and the pattern it was maybe 50 Euro. Now I am already thinking of making another one, maybe in brown, with reflective piping, in a lighter quality…

Monday, May 23, 2011

Me-Made June

I, Henrike of http://hensweblog.blogspot.com/ sign up as a participant of Me-Made-June '11. I endeavour to wear
at least one self made or refashioned garment each day for the duration of June 2011.

I will have to repeat items, but allow myself only to count each one twice, and will try to use it in different outfits.

I just checked and found that I have 13 garments suitable for June weather, so I have to finish at least two started projects before or during June. Or hope for a period of cold weather so I can incorporate more of my self made clothes...

Friday, April 29, 2011

A few small projects

I sewed up some small quick projects.

A bag for my Yogamat, from fabric I found in my stash when sorting through it for the fleamarket on Queensday.


New covers for two bolsters I had also made myself. I bought the fabric at Liberty's when I was in London the first time. Had pictured a kind of 50s dress, but - get real!


And sleepshorts from fabric I bought in Alabama, with a fun print of Getas (Japanese "Flip Flops"). The pattern is called "perfect fit sleep shorts" in the book "One yard wonders", drafted according to individual measurements. They fit but I prefer a more advanced pattern even for shorts, for example from the crotch down goes a vertical line and does not curve back to the leg. Still o.k. for the pupose of sleepshorts or for an attempt to get a tan on the balcony.

Friday, January 7, 2011

Summary of 2010

Inspired by Sharon (http://petiteandsewing.blogspot.com/2011/01/2010-what-year.html) I make a little review of last year’s sewing.

Pieces made:
Tops: 11
Skirts: 5
Presents: 5
Dress: 1
Coat: 1
Accessoires: 1
Bag: 1

So on average that is two pieces per month and that is exactly what I had aimed for. About half of them are quite basic pieces that can be worn on a regular basis, I am very happy about that. The rest is either special (paranimf dress), or I gave it away (the presents) or can not be worn at all – and I don’t mean the bag by that!

Highlights:
A highlight sewing wise in 2010 was in August the meeting with online sewing friends in London (http://artisanssquare.com/sg/index.php/topic,7881.70.html). People who enjoy spending hours just in the textiles section of the V&A museum. Fabric shopping with people who like fabric shopping!

2011 Sewing Goals:
With my thesis to be finished, I don’t think I can keep up this productivity. I will probably move this year, and be temporarily without a paid job, so a good resolution will be:

1) I am only allowed to buy fabric for one new project after I sewed two things from stash/UFO. Purchased fabric has to be used within three months.

Looking at my “pieces made” list, the number of tops reflects my actual needs quite well, but I made so many skirts while I mainly wear pants:

2) Sew pants. Wear skirts more often.

Finally, Sharon made a nice collage in her annual review of the pieces she made last year, and I can’t.

3) Take photos of everything I made. Show photos here and at http://artisanssquare.com/sg/index.php

Happy 2011!